. .

tutorial

Getting GLASS Running with Pharo

October 18, 2010 12:20:54.988

I'll do a screencast on this later this week, but I thought it might be useful to toss out some quick "how do I get it running?" instructions. I downloaded GLASS and a "one click" Pharo image from Gemstone's website, but then I ran into problems connecting to the database. James Foster was extremely helpful, and the steps I'm outlining here came from him.

Step one - if you're on Mac or Linux, as I am, use the installGemstone.sh script.

Step two - grab the one-click Pharo image

Step three - do this in a terminal window


source /opt/gemstone/product/seaside/defSeaside

That sets up the environment variables you'll need. Next, you'll want to get the server running, and for the "I'm just experimenting" case, you probably don't want all the security bells and whistles. So, do the following:


/opt/gemstone/product/bin/startnetldi -g -a YourUserNameHere
/opt/gemstone/product/bin/startstone seaside


It's probably simplest if you set up a script, something like this:


#! /bin/sh
source /opt/gemstone/product source /opt/gemstone/product/seaside/defSeaside
cd $GEMSTONE
./bin/startnetldi -g -a jarober
./bin/startstone seaside

And then one to shut things down:


#! /bin/sh
source /opt/gemstone/product source /opt/gemstone/product/seaside/defSeaside
cd $GEMSTONE
./bin/stopnetldi
./bin/stopstone seaside

Now, you should have GLASS running. You'll need to start your Pharo image. I used a command line from the same terminal I started GLASS from, but that's not essential - you can just double click on the app bundle. You'll get something like this:
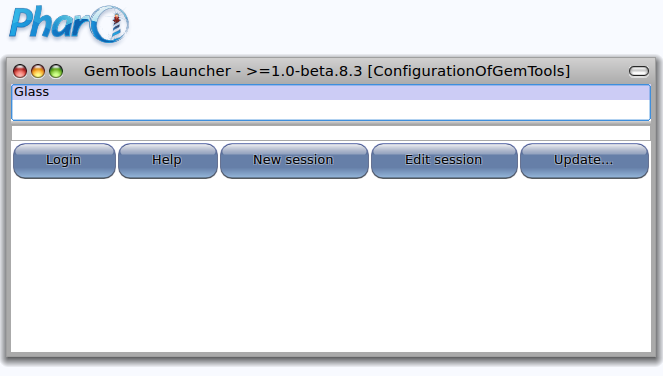
Next, you'll want to edit the settings for the connection:
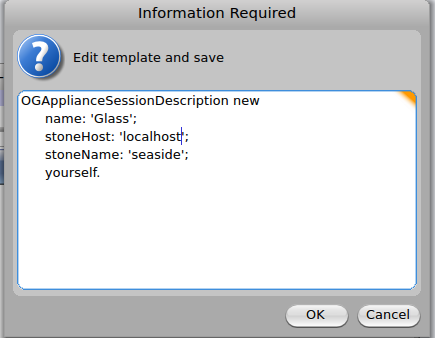
Now, hit the "Login" button, and you'll get prompted for your name:
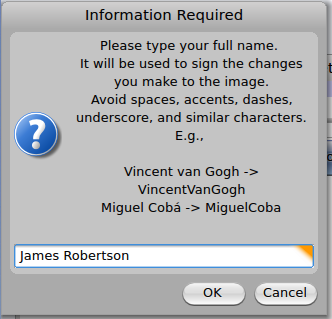
After you enter that, here's what you should see:
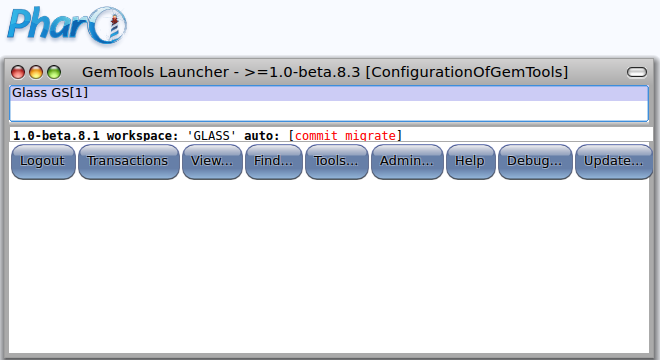
From there, you can get started with your first GLASS/Pharo project!

Technorati Tags: , , ,

posted by James Robertson

 Share Tweet This

tutorial

Using the Amazon Cloud with Smalltalk

September 27, 2010 15:06:13.021

One of the cooler packages in the public store repository is Cloudfork - to get it, just load "Cloudfork-all" into VisualWorks or ObjectStudio. from there, and then you can access whatever cloud services you use on Amazon. You'll need key info (you get that from Amazon), and you'll need something actually stored there. From there:


"get access"
credentials := CFAWSCredentials newWith: key andSecret: secret.
s3 := CFSimpleStorageService newWith: credentials.

Now that you have your credentials lined up, you can query the buckets you have on S3:


"get buckets"
buckets := (s3 allBuckets) result.
Transcript clear.
buckets do: [:each |
	Transcript show: 'Bucket: <', each name, '>'.
	Transcript cr].

Now open up a bucket and see what's inside it:


"open a bucket"
bucket := s3 openBucketNamed: 'jar-images'.
all := bucket getList result.

Finally, now get an item and have a look at it. In my case, it's a JPEG:


"now extract first item"
key := all first key.
byteArray  := (bucket getObject: key) result.

"save to a file"
file := 'imgFroms3.jpg' asFilename writeStream.
file binary.
file nextPutAll: byteArray.
file close.

"now open it"
img := (ImageReader fromFile: 'imgFroms3.jpg') image.

And that's it. I did a screencast on this awhile back as well:

Technorati Tags: , , ,

posted by James Robertson

 Share Tweet This

tutorial

A Look at the Comparison Tool

August 28, 2010 14:16:11.000

The Comparison tool - used to compare versions of code in Cincom Smalltalk - is new in VisualWorks 7.7.1, and there's been a bunch of talk about it on the mailing lists lately. I thought it might be useful to take a look at one of the common use paths you might take through it. To start, I connected to the public store repository, and selected part of my Silt blog server package:

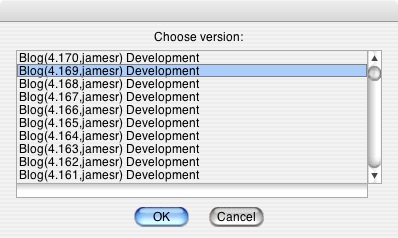
What I was doing above was selecting the package I wanted (Blog), and then, using the menu, comparing it with another version. That prompted a selection dialog - so I could select which version to compare to:

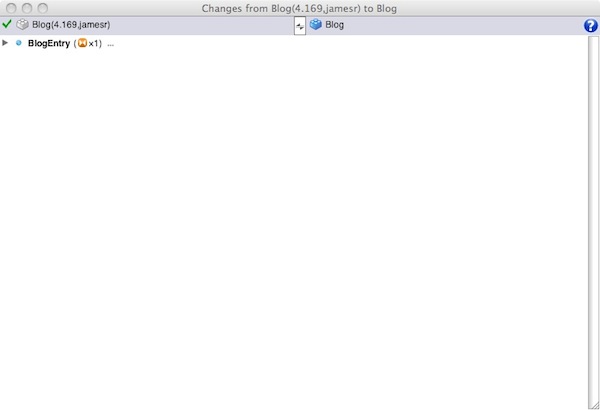
After selecting the package, the following window comes up - and this is where you start to see the new UI:

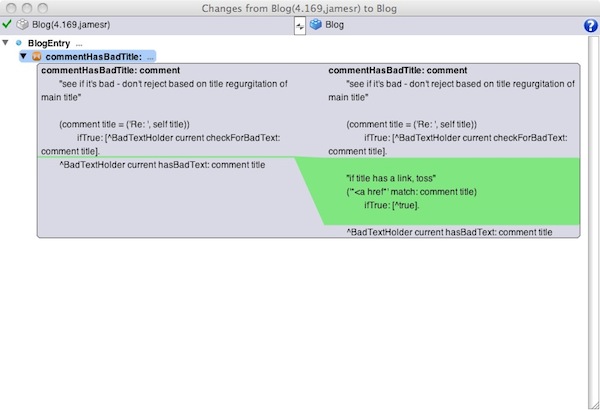
On the left side is the version I selected to compare against - on the right is what's loaded in the image. Notice the expansion symbol in the lower part of the UI; you click that to expand out and see the differences:

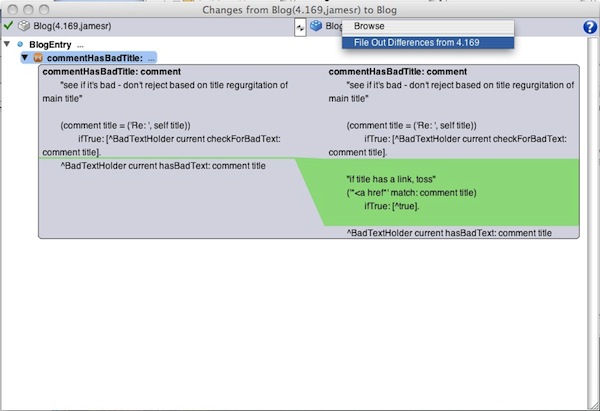
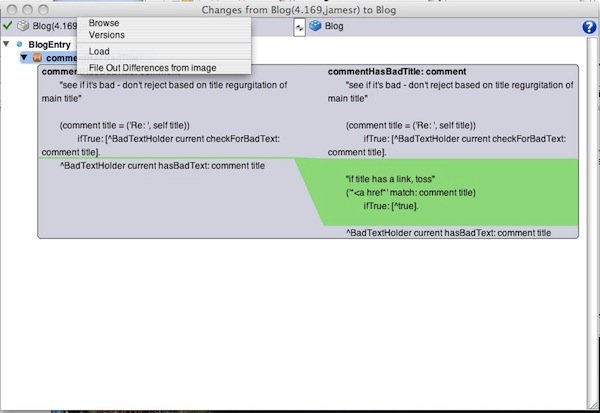
Notice how the green line runs from the left to the right, showing the changed/added/removed (in this case, added) text? That's how you can spot the changes quickly. When there are multiple changes, you can expand/collapse them individually. Now, if you do what I do, and patch a running system with diffs, you'll want the next option - right click at the top to summon an action menu:

And there's a menu on the left hand side at the top as well:

That wraps up the brief tour of the new Comparison tool - I'll be doing a screencast on it soon.

Technorati Tags: , , ,

posted by James Robertson

 Share Tweet This

tutorial

Creating a Simple Runtime

June 21, 2010 11:54:31.107

I received a question about creating a runtime image via my chatback widget this morning - I've done screencasts on that, but those use BottomFeeder as an example. While that's a real example, it's also fairly large, and somewhat complex. So - I thought a very simple example might be useful.

First, I created a new package, and then a new class (subclassed from Object) with no instance variables.


Smalltalk defineClass: #Sample
	superclass: #{Core.Object}
	indexedType: #none
	private: false
	instanceVariableNames: ''
	classInstanceVariableNames: ''
	imports: ''
	category: ''

I gave this class one method:


doMyThing
	Transcript show: 'This is from the Sample App'; cr.
	ObjectMemory quit.

So that the results are clear, I ran the application in headless mode - the Transcript write drops to a file called 'headless-transcript.log' (that's configurable, but never mind). Next, I need a way to have this application startup. I created a new class:


Smalltalk defineClass: #SampleUserApp
	superclass: #{Core.UserApplication}
	indexedType: #none
	private: false
	instanceVariableNames: ''
	classInstanceVariableNames: ''
	imports: ''
	category: ''

That's a class that exists to define a startup procedure. You create a new method called #main, and put your startup code there:


main
	Sample new doMyThing.

Next, I need a script that creates a new image, and puts it into "runtime" mode - the #main method will not fire unless the image is in that state. Here's the script:


"build a simple app"

"load all my needed parcels (Non-Windows)"
[#('SampleApp.pcl') do: [:each |
        Parcel loadParcelFrom: each]]
	on: MissingParcelSource
	do: [:ex | ex resume: true].

"turn change log off, so that we can ship patches reasonably"
'ChangeSet.BroadcastChanges' asQualifiedReference 
	ifDefinedDo: [:flag | 'ChangeSet.BroadcastChanges' asQualifiedReference value: false].

"Set herald string"
ObjectMemory setHeraldString: 'This is an Example Application in VisualWorks'.

"reset parcel path"
Parcel searchPathModel value removeAll.

"set up runtime state"
DeploymentOptionsSystem current startInRuntime: true.

"set up runtime state"
UI.WindowManager noWindowBlock: [:windowManager | ].
stream := WriteStream on: String new.
stream nextPutAll: 'changeRequest'; cr; cr; tab.
stream nextPutAll: '^true'.
VisualLauncher compile: stream contents.
VisualLauncher allInstances do: [:each | each closeAndUnschedule.  each release].

ObjectMemory garbageCollect.
Workbook allInstances do: [:each | each closeRequest].
(Delay forSeconds: 20) wait.
Parcel searchPathModel value: (List with: (PortableFilename named: '.')).
SourceFileManager default discardSources.

"Now save the image such that this file does not get looked for at startup"
[ObjectMemory permSaveAs: 'sample' thenQuit: false] fork.
[(Delay forSeconds: 45) wait.
RuntimeSystem isRuntime ifFalse: [ObjectMemory quit]] fork

I saved the code I created to a parcel, so that I could do a clean load. On my Mac, the command line looked like this (I have a symlink from visual to where the VM actually resides):

./visual visual.im -filein sampleDeploy.st

Where 'sampleDeploy.st' is the script above. Running that drops a single line to 'headless-transcript.log' and quits, just as you would expect. You can copy the script from above, and download the example parcel here.

Technorati Tags: , ,

posted by James Robertson

 Share Tweet This

tutorial

Adding a Custom Tab to the Smalltalk Browser

June 8, 2010 21:48:53.338

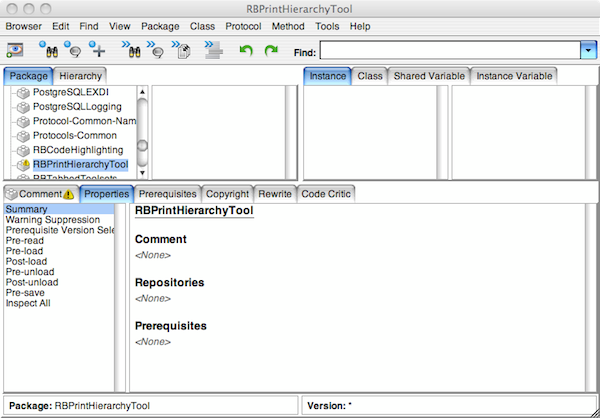
This is a written companion piece to this morning's screencast - I'm going to cover how to add a custom tab to the browser. The example I'm using is simple - every class understands the method #printHierarchy, which gives you a textual hierarchy diagram. At one time, that was a view possibility in the browser (circa 5i). Today, we'll add that back in a tab. To start, create a new package:

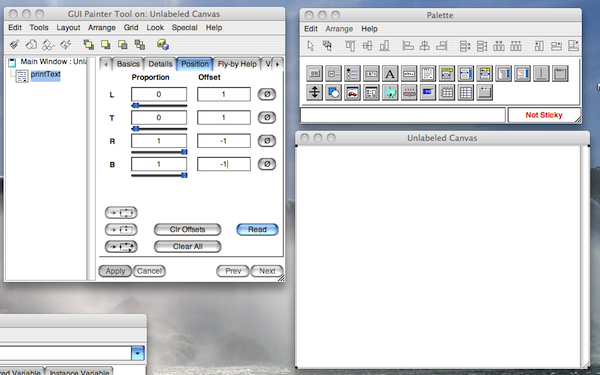
With that package created, we need a UI for the tab. It's a simple one, with a text widget filling the canvas. Using the UIPainter, create something like this:

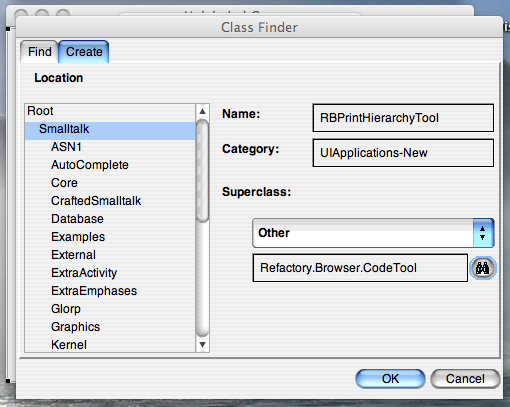
Once that's created, install it as a subclass of Refactory.Browser.CodeTool. Select the "other" drop down option in the install tool and enter that in:

With that installed, we need to write some code - in this case, three instance side methods:


isActive
	^self classOrNameSpace notNil

#isActive is sent to determine whether or not the tab should be visible. In this example, it should only be there if a class or namespace is selected. You an examine the methods in class CodeTool to see what's easily possible. Next, the tab needs a name:


tabName
	^'Print Hierarchy'

Finally, something needs to actually happen when the tab is selected; we'll add a #postBuildWith: method to fill our text widget with the text for the "diagram"


postBuildWith: bldr
	| classOrNamespace |
	super postBuildWith: bldr.

	classOrNamespace := codeModel classOrNameSpace.
	self printText value: classOrNamespace printHierarchy

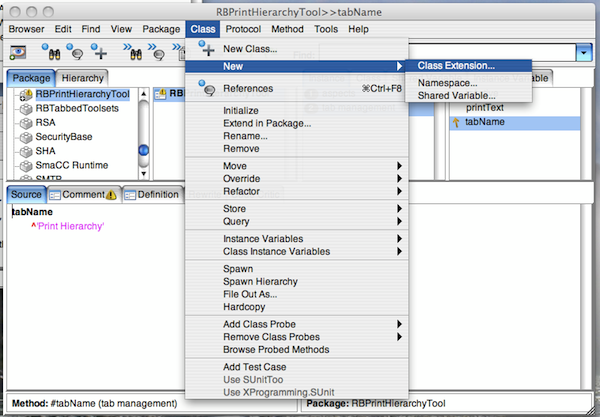
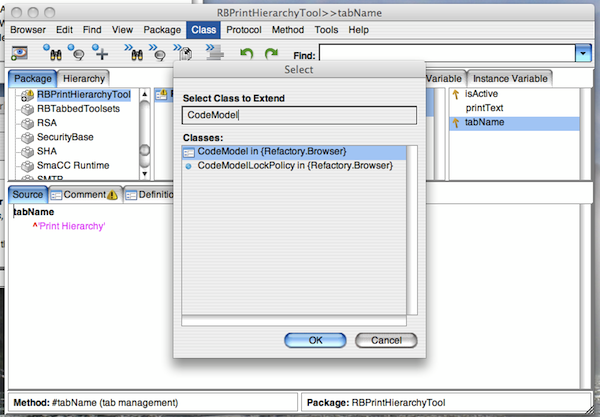
That's almost enough. What we need to do now is tell the browser that our new extension exists. To do that, we'll extend class CodeModel

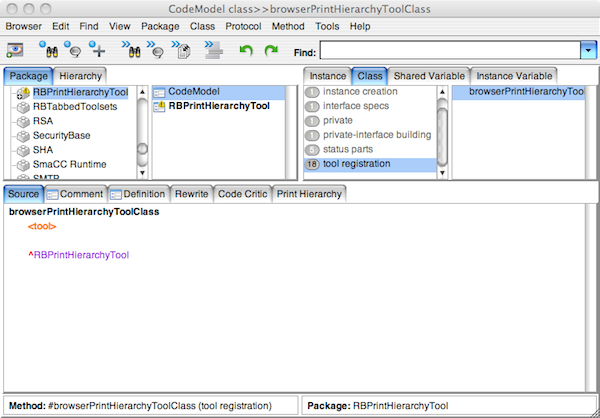
Go to the class side, and add this method:


browserPrintHierarchyToolClass
	<tool>

	^RBPrintHierarchyTool

The part in brackets is a pragma. The code simply tells the browser what class to throw into our tab. That's it; open a new browser, and select a class:

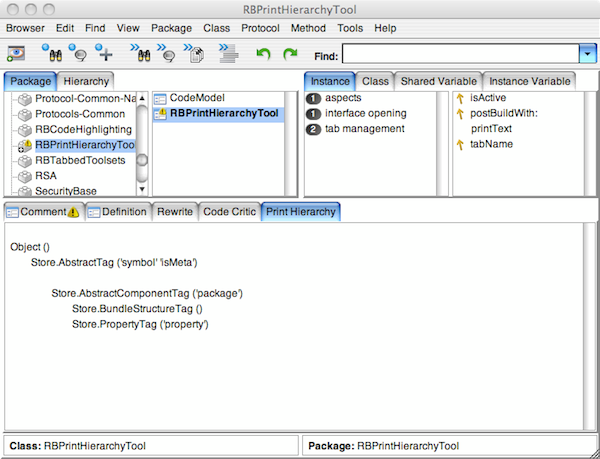
Now, select a class, and watch your new tab in action:

You can download the code here, or just head over to the Public Store Repository and load the RBPrintHierarchyTool package

Technorati Tags: ,

posted by James Robertson

 Share Tweet This

tutorial

Open a Window Where You Want It

May 14, 2010 7:10:42.876

Ever wanted to set a window's opening location programmatically in VisualWorks? It looks harder than it is. As you wend your way through the opening code, it's easy to just throw your hands in the air.

Here's a simple solution (thanks to Travis for this one)

  • Create the window using the UI tools
  • Copy the #windowSpec method (class side) to something else, like #baseWindowSpec
  • Now, create a new #windowSpec method like this:


windowSpec
	"make it open where I want it"

	| spec |
	spec := self baseWindowSpec decodeAsLiteralArray.
	spec window bounds: (100 @ 100 extent: 400 @ 500).
	^spec literalArrayEncoding

Replacing the dimensions, of course, with what you actually want. What does that do? It grabs the spec and manipulates the object directly - which, insofar as the framework allows, is the right thing to do. Anyway, it's a simple way of getting a Window to open where you want it to - enjoy.

Technorati Tags: , ,

posted by James Robertson

 Share Tweet This

tutorial

Setting Up Store for SQLite

May 13, 2010 13:30:18.459

One of the hurdles to using version control with Cincom Smalltalk has been the requirement that you set up a relational database - Oracle, SQLServer (etc) are fairly complex beasts. Even PostgreSQL, which is free, can be difficult to set up. Recently, however, it became possible to use SQLite as the back end for Store - and nothing could be easier than using that - it's a simple file based database. If you're on Windows you might have to visit the website and install SQLite, but that's a simple matter of pushing a dll or two onto your system - you can set up databases on the fly.

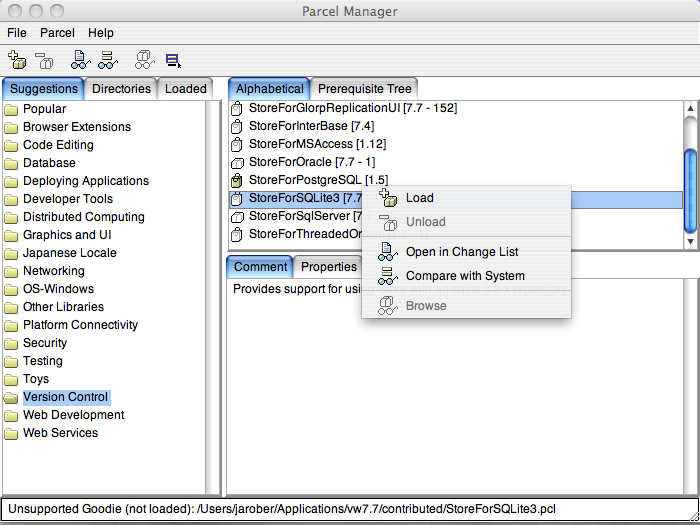
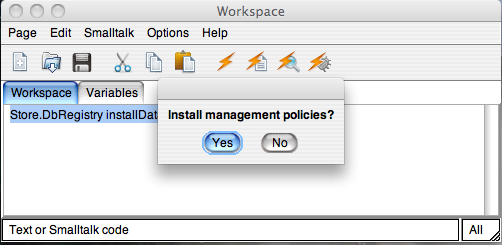
For Store itself, here are the steps - first, open the parcel manager and load the appropriate support:

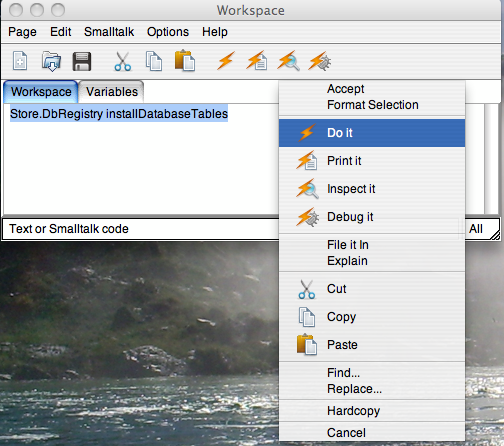
Next, just type the following code into a workspace and execute it:


Store.DbRegistry installDatabaseTables.

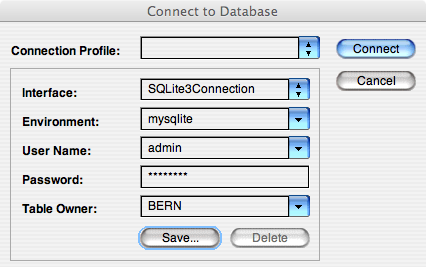
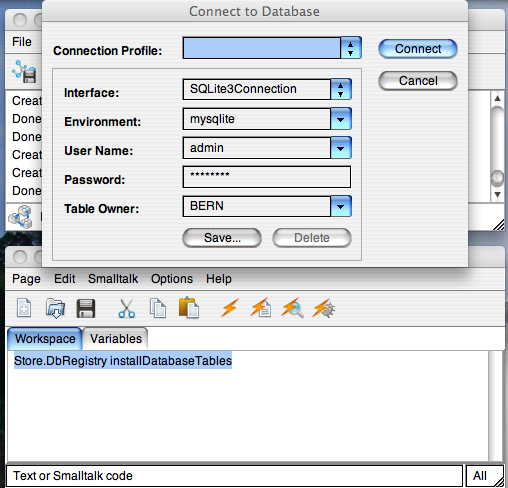
You'll be prompted a few times; first is a login. For this, the username and password don't really matter; just put in anything. Be sure to pick SQLite3Connection from the drop down though:

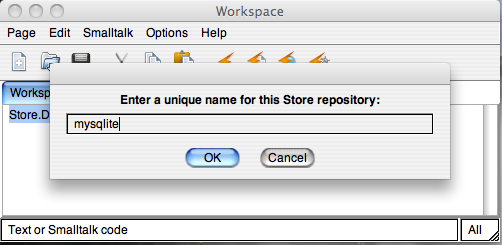
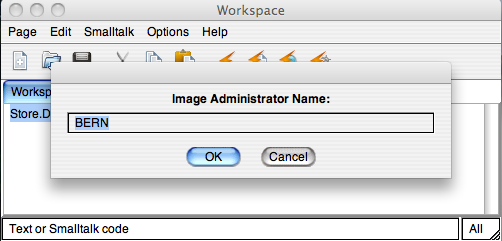
Next, fill in the same name you used above for the repository:

For the next two prompts, just let them default:

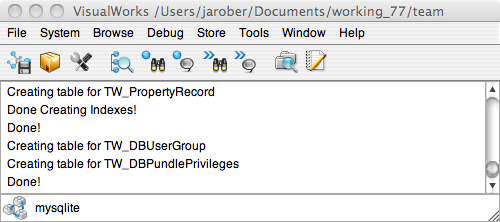
That's it for installation. Now pull down the Store menu and connect to your new repository:

And that's it - notice the name in the lower corner of the launcher - you're up and running!

Technorati Tags: , , ,

posted by James Robertson

 Share Tweet This

tutorial

Using ActiveX Controls with VisualWorks

March 24, 2010 12:08:41.973

I thought a small walkthrough on using the new ActiveX control capabilities of VisualWorks 7.7 might be useful, so here goes - you can download the code I built in the screencaptures below here.

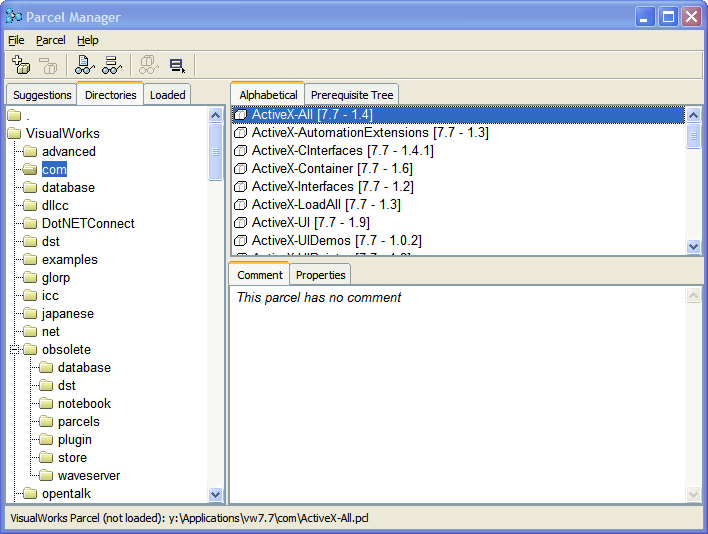
With that out of the way, here's how to build it yourself. First, load the ActiveX support - to do that, you need to open the parcel manager, and switch to the directories tab - then select "com":

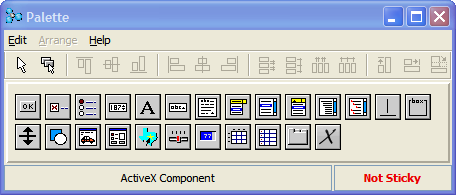
Once that's in, open the GUI builder, and you should notice a new widget: the ActiveX widget. This functions (from a Smalltalk perspective) a lot like the subcanvas:

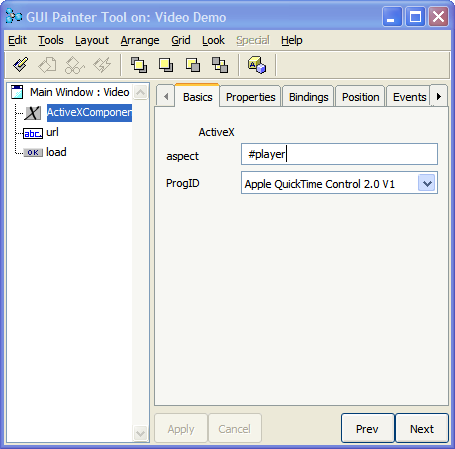
Once that's selected, add it to the canvas. In the properties tool, give it an aspect, and then pick (from the collection of items in the lower menu) the control you want. Your list will vary, based on what happens to be installed on Windows:

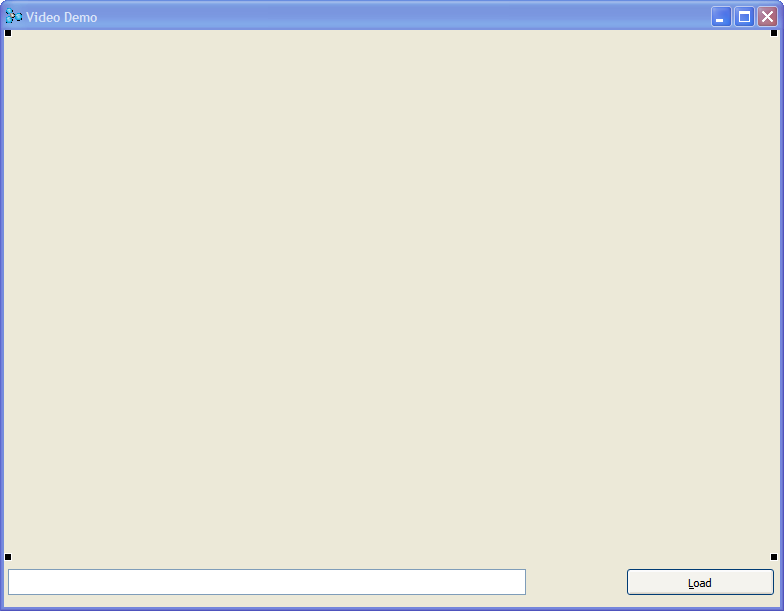
Now, add an input field (for the url you'll be loading) and a button (to do the load). It should look like this:

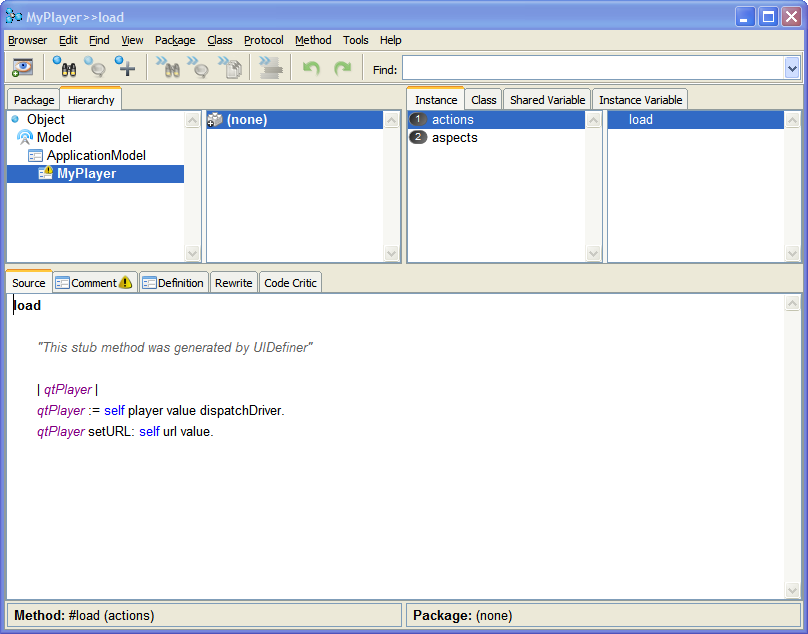
Install that to a class, and then use the "define" menu option to set up the method stubs. Now, go to a browser, and change the #load method (the one being used by the button) to look like this:

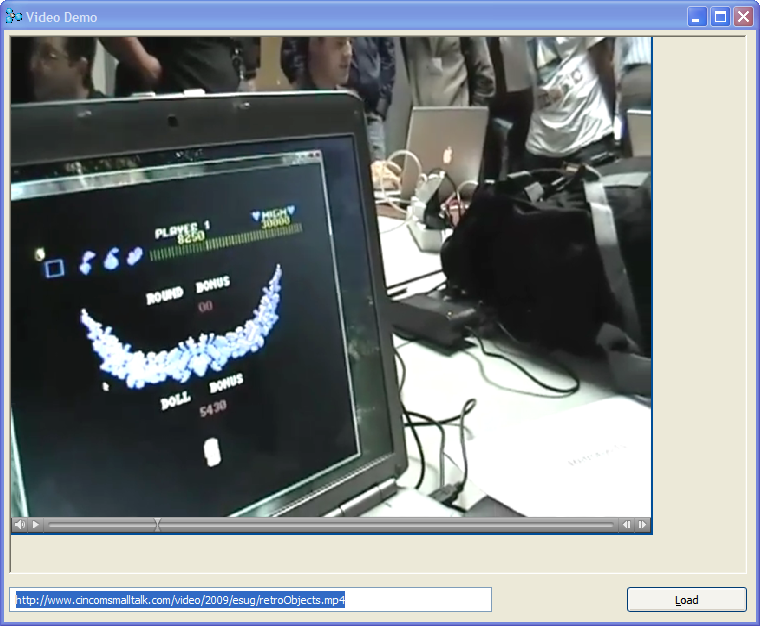
That's it for the hard stuff - now open the UI, and enter an URL for something that Quicktime can play:

You may have to wait a bit for it to buffer, depending on how fast your internet connection is (use a file url if you have a very slow one). If you use the link above, a short video from ESUG, of Gabriel Honore demonstrating his RetrObjects project, will play. That's it!

Technorati Tags: , , ,

posted by James Robertson

 Share Tweet This

tutorial

Using Excel from ObjectStudio

March 17, 2010 8:10:13.306

Yesterday, I pushed up a short walkthrough on using Excel from VisualWorks; this morning I did a screencast on using Excel from ObjectStudio. Here's the walkthrough for that piece.

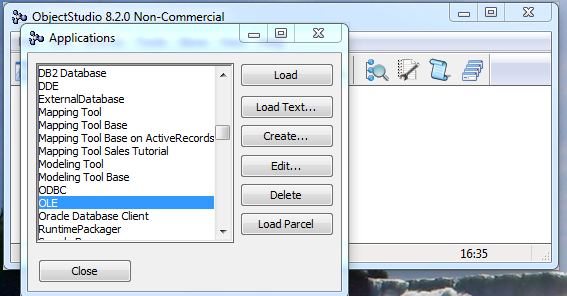
First, you'll need to load the required support. Using File>>Load Application in the launcher menu, select "OLE" and load:

Once you have that loaded, open a workspace (from the Tools menu) and add the following script - you can start exploring the COM APIs from here and tweak the script as needed:


| ole excel wb range value |
"get the dispatcher for Excel"
ole := OLEObject newProgId: 'Excel.Application'.
excel := ole dispatcher.

"open Excel and get a worksheet"
excel call: 'Visible' params: (Array with: true).
wb := excel call: 'Workbooks' params: #().
wb call: 'Add' params: #().

"Now add some data"
range := excel call: 'Range' params: (Array with: 'A1').
range at: 'Value' put: 'Fred'.
range := excel call: 'Range' params: (Array with: 'A2').
range at: 'Value' put: 'Flintstone'.

"make the range bold"
range := excel call: 'Range' params: (Array with: 'A1:A2').
(range at: 'Font') at: 'Bold' put: (Array with: true).

"Now read a cell back"
range := excel call: 'Range' params: (Array with: 'A1').
value := range at: 'Value'.
^value

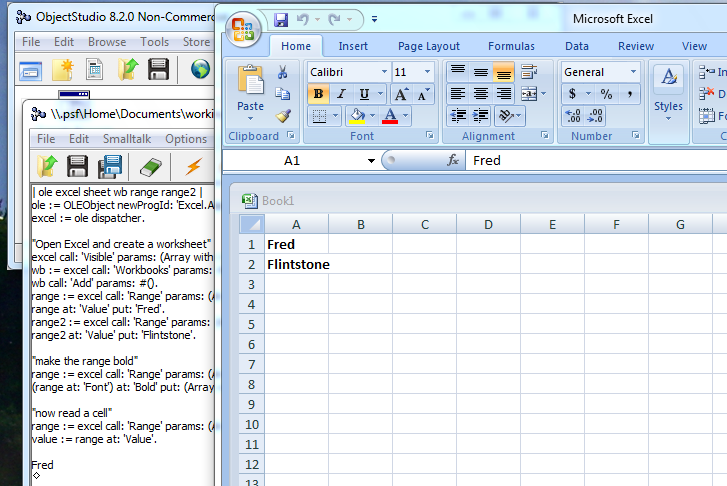
Unlike VisualWorks, you don't need to highlight that code - simply pull down the Smalltalk menu in the workspace and try "Insert" (which will print the results into the workspace) - you should end up with Excel opened up, with "Fred" in A1 and "Flintstone" in A2, and "Fred" in your workspace at the bottom - like this:

That's pretty much it - you can explore the available COM APIs and work from there - but this should get you started.

Technorati Tags: , , ,

posted by James Robertson

 Share Tweet This

tutorial

Using Excel with VisualWorks

March 16, 2010 16:57:41.324

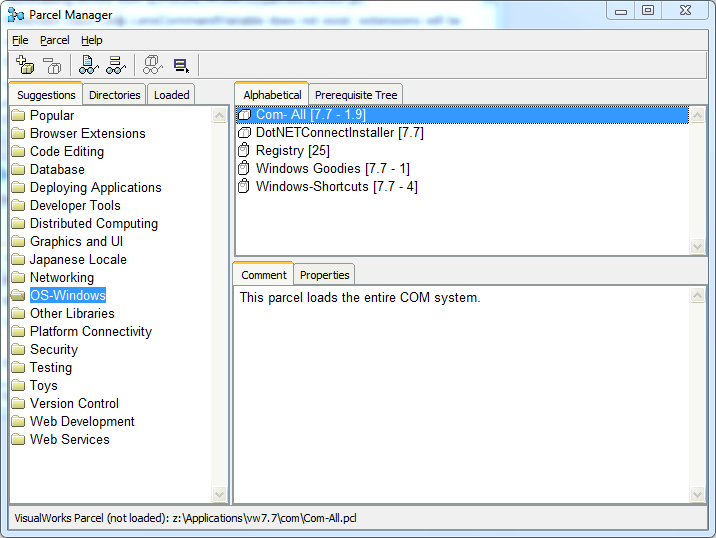
This morning I did a screencast on using Excel with VisualWorks; I thought a simple walkthrough might be handy as well. The first thing you need to do after starting VW is pull up the Parcel Manager, select "OS-Windows" on the left, and "COM-All" on the right. Right click and load:

Next, close that window, and in a workspace, add this little script. Once you try it out, you can experiment on your own - and use the "Browse Automation Classes" option under the COM menu in the Launcher to explore the interfaces available to you:


"Start Excel, get dispatch driver"
excel := COMDispatchDriver createObject: 'Excel.Application'.

"Open Excel visibly"
excel setVisible: true.
excel getWorkbooks Add.
sheet := excel getActiveSheet.

"Write some data"
(excel getRange: 'A1') setValue: 'Name'.
(excel getRange: 'A2') setValue: 'Fred Flintstone'.
(excel getRange: 'A1:A2') getFont setBold: true.

"Read a cell"
(excel getRange: 'A1') getValue.

"Copy Cells"
(excel getRange: 'A1:A2') Select.
excel setCutCopyMode: false.
excel getSelection Copy.
Transcript show: Screen default getExternalSelection.

That code creates a dispatch driver, and then calls various COM APIs exposed by Excel. You'll see a few dialogs like this pop up as you execute that, as the message sends are going to COM, not Smalltalk - and thus, they don't exist in the image:

Just use the "proceed" button to dismiss those. Once you've executed all the code, you should see something like this:

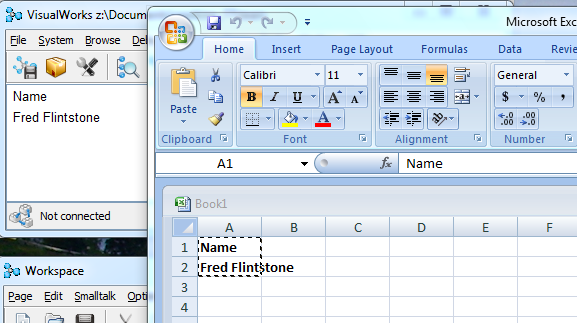
Which should be Excel with the data you entered highlighted, and the copied data sitting in the Transcript, where we printed it. That's it - you're now working with Excel from VW. Go ahead and use the automation browser to explore the full API set.

Technorati Tags: , ,

posted by James Robertson

 Share Tweet This

Next (15 total)